New life
for an Old Camera Bag!
Text
and images (c) 2013 by David S. Young.
www.FURnFEATHER.ca
|
|
Over the years, I've
"renovated" several camera bags, turning them into custom fitted cases.
Doing
this has several advantages. The first is that you end up
with a case
which fits your needs, tastes and equipment. The second is that by
carefully fitting the gear, you can get more stuff, in less space.
Certainly more so than with commerical bags designed to hold most
things well, but never your stuff really well! Lastly, by using an
old, but still in decent
condition, bag you
end up with a kit that does not look like it holds the modern,
expensive gear that it does. This can be a huge advantage,
when
travelling in third-world countries - or even in certain
neighbourhoods, at home!
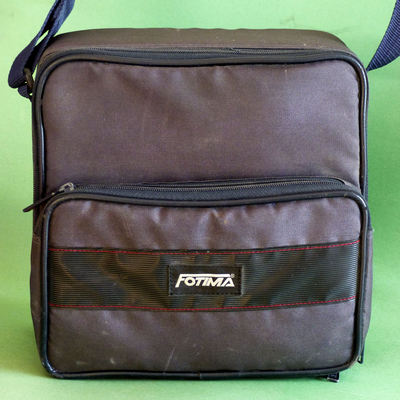
This time, I used a bag that I've not used since I took an Olympus OM-1
to the USSR (now called
Russia - for those of us too young to
remember), back in 1975. (Even
I was amazed that I still owned it!)
And, it did seem fair to be putting another Olympus in it!
Of course, if you don't
have such a bag, there are tons to
choose
from at used camera stores and trift shops. Just be patient until one
with potential comes along.
I'd
just
purchased Olympus's new EM-1, with a couple of their small
lenses.
Being a semi-pro photographer, I wanted top quality, but in a
small, light, package that I can take anywhere. The E-M1, the
new
12~40/2.8 PRO zoom, and the 75/1.8 prime lens filled the bill.
For more reach, I added an older, well-loved, 200/4
Micro-Nikkor. A great lens!
This
combination gives me (after allowing for the crop factor) a 24 to 80mm
zoom, an very-fast 150mm lens for portraits and medium-tele work, and a
400mm f4 lens for those times when you simply need "reach", whether for
wildlife or simply something a good distance away.
This
project is neither difficult nor expensive, but it *is* very time
consuming.
You have been warned!
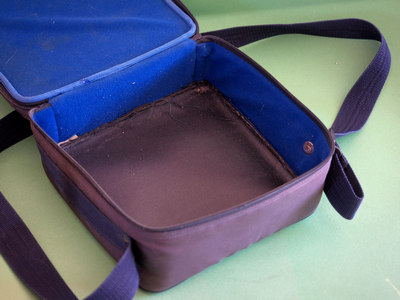 |
Start
by taking all the innards out of the old case. All you really
want is the shell.
Then, fit a new bottom to the case. In past, I've used baltic
ply
- most often used for model aircraft - strong & light, if not
particularly cheap. This time I used a piece of old
hardboard,
that used to be the backing in an 11x14 picture frame. Since
my
new case was 9x9 inches square (about 23cm sq.) the dimensions worked
out just fine. I cut it to size on a table saw and rounded
the
corners.
I laid the equipment that I wanted it to hold on the base and
experimented with dozens
of possible layouts, until one just seemed to work.
Then, using balsa-wood (for
both strength and lightness) cut and make
the 4 sides and major dividers. To hold it all in
place, I use the paper tape made for
mudding drywall (at
your local builder's supply for around $3 for 250
feet or about 75 meters). |
I
do this by folding the paper along the pre-made score. Using
contact cement, coat both of
the
boards and the paper and let them dry. When dry, carefully
place
them together. Using paper on both sides of
the piece being joined makes it both lightweight and very
secure.
BTW, regular contact cement is faster, as it dries faster ... but it is
very smelly and shouild be used with adequate ventilation.
This time I used "low-odour" contact cement (by
LePage) and it dries more slowly, so the job took longer.
But,
there was absolutely no noticeable fumes! Lovely!
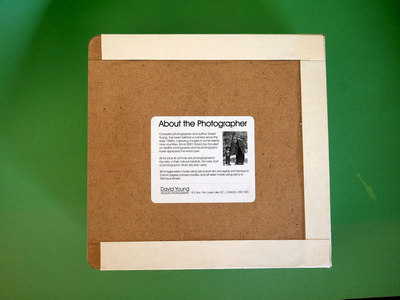
In this case, as the board came from the back of a damaged frame (from
one of the wildlife photos I sell) and it still had an "about the
photographer" label on it. Since, on the
bottom,
it would not be seen; I decided to leave it there as identification -
in case of
theft. |
|
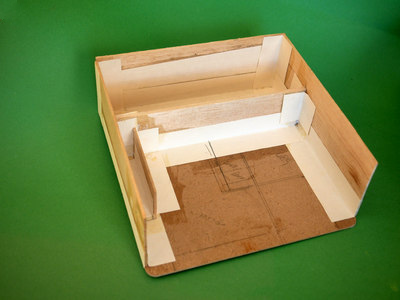 |
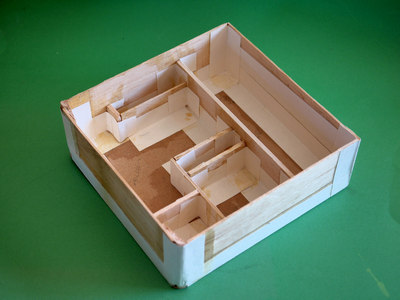
At the left, you can see
three sides and the main divider, already built.
At several points along the way, it is adviseable to physically hold
your gear in the spots allowed, to be double-sure that it will all fit
as planned.
I made one mistake, of about 1/8th of an inch, making the spot for the
main lens to small. Tearing it all out, at starting again was
most annoying, but my own fault.
When you've got all four sides done (below left), it's best to fit the
frame inside your case (below right), just to be sure! You
don't
want to go to a lot more work, on something which will not fit!
When you are satisfied that all is well, remove it, as it's easier to
work on, outside your case. |
  |
Finish
making and securing your dividers, and when that's done, you
can cut small strips of soft velour fabric. Using
contact cement, apply them to the tops of all
the dividers.
Your case will soon begin to look like this... |
When
all the
tops are done, make the sides and bottom covers. I do this by
using contact cement to coat pieces of ceral box, cut to fit, I glue
the fabric to one side, then turn it over and coat the edges of the
insides. I cut the corners at 45 degrees to the sides, so
that
when the fabric is folded over, it does not overlap itself and thus
take too much space.
When one is made, I glue it in place, and then move on to the next.
This is far slower than making all the covering bits at once
..
but it solves the problem of having to allow for size of the covers on
one side, when making the covers for the other side of a compartment.
I use closed-cell foam rubber for the bottoms of camera and lens
compartments, as well as the sides, whenever space allows. In
the
narrow bits between lenses and cameras, I fit in small holes for
filters, SD cards, spare batteries, etc. |
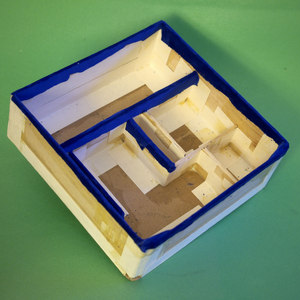 |
When
all
is said and done (this
one took me the better part of 3 days), you end
up with a case that looks old on the outside, but holds all your gear
so it's neatly and readily accessible.
|
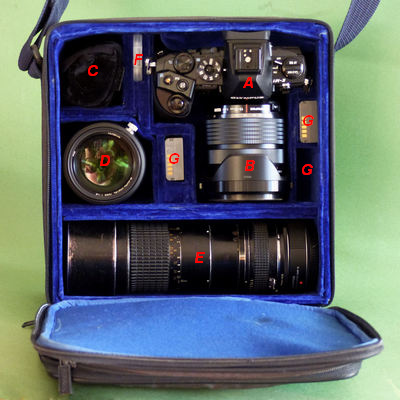
A
- Olympus E-M1 Camera body.
B - Olympus 12~40/2.8 PRO Zoom lens (mounted on body)
C - Olympus Flash (came with the camera)
D - Olympus 75/1.8 Prime lens.
E - 200/4 Micro-Nikkor lens with Oly's FT to mFT adapter.
F - Spare 16gb SD Card
G - Spare batteries x3 (The
empty space is for one still on order.)
Since a 16GB SD card holds nearly 900 RAW images, one in the camera and
one spare will do me, for a day. As the batteries are small
(it's
a small camera!) each one is good for only about 300 to 350 shots. But,
with one in the camera & 3 spares, again, I'm good for a day,
as I
rarely shoot more than 1000 images in a day. If you do, there is space
in the front pouch for more!
Battery charger(s), cord, extra filters, etc., all fit in the front
pouch.
In the end, it all fits in a 9x9x4 inch (23x23x10 cm) case that weighs
just 6 lbs or 2.7kg. At the airport, it and my small, 10"
laptop both fit
into a small tote that matches our luggage and becomes my carry-on!
With a total weight of under
10 pounds (~4.5kg) it fits neatly under a seat or in the overhead bins.
|
| If
you found this, or any of my reviews, helpful, please consider
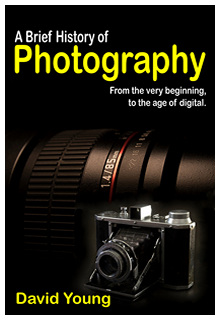
supporting this effort by purchasing my e-book, "A Brief History of
Photography", It is, by
far, the most complete, up-to-date, history of photography, anywhere and should be required reading for every
photographer.
"A Brief History of Photography"
is just what it says it is. Fast paced and easy to read, yet it covers the history from 1614 right through to early 2020. Spanning the equivalent of 450 printed pages, it covers not only the chemistry, but the seminal cameras, films,
sensors, lenses and accessories of their day; along with their
companies and their inventors.
It includes hundeds of "trivia" entries - which offer little-known background stories on both
the inventors & their inventions.
Profusely illustrated.
To learn more, click on the book, at the right.
You can also read it on just about any platform via free apps from
Kobo.com

|
 |
If
you've
found this review helpful, you might enjoy some of my other reviews,
found here. You might also
enjoy
my wildlife
photos, all taken with Leica or Olympus glass.
If interested, you
can
also find my antique Debrie
Sept and 1950 Beauty
Six (one of only two
known
to exist in the
world)
at Camer-Wiki.org.
Thanks for reading.
Last
updated: 27 February, 2015 |
|